

ベーシック アドベントカレンダー 8日目です。
Web Components 周辺ライブラリで有名な lit-html が実装している DOM のレンダリング手法を参考にしながら、DOM の差分を効率的にレンダリングする方法を検証してみました。
ただ、今回検証したのは限られた条件かつ lit-html ほどの効率性にはなっていません。方向性を理解するためのシンプルな構造にしています(というか lit-html のやり方を完全に僕が把握していないというだけ)。ちなみに lit-html は Virtual DOM を使わずに Template Literal と標準 API で実装をしているようです。
今回検証用に実装した操作の流れは以下のような感じです。
- Tagged Template Literal で HTML 文字列を受け取る
- 動的に変更される場所をマーキング
- 依存データが変更されたらマーキングされた箇所だけを変更
これが動作の様子です。
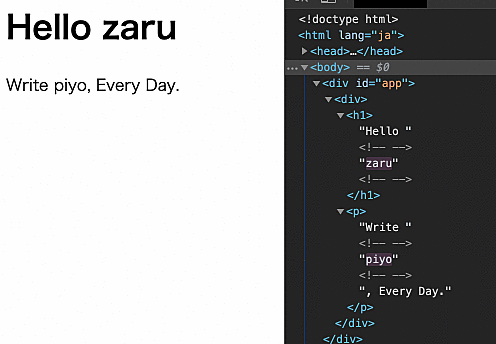
右側の DevTool を見てもらうとわかりますが、更新されているのは対象の TextNode だけです。 innerHTML で HTML 全体を代入すると、すべての Node を作成し直さなくてはなりませんが、このやり方であれば必要最低限の変更コストで済みます。今回の例は TextNode にしか対応をしていないのでシンプルすぎてあれですが…実際には属性やイテレータなど対応することで幅広い表現が効率的に実現できると思います。
次に全体のソースコードです。
class MyRenderer {
  constructor() {
    this.parts = []
  }

  html(strings, ...values) {
    return {
      strings: strings,
      values: values,
      markedTemplate: this._mark(strings)
    }
  }

  render(template, parentNode) {
    if (this.parts.length > 0) {
      this._update(parentNode, template.values)
    } else {
      const templateNode = document.createElement('template')
      templateNode.innerHTML = template.markedTemplate
      this._mappedValue(templateNode)

      const clone = document.importNode(templateNode.content, true)
      this._update(clone, template.values)
      parentNode.appendChild(clone)
    }
  }

  _mark(strings) {
    let template = ''
    strings.forEach((string, index) => {
      template += string
      if (index < strings.length - 1) {
        template += '<!-- -->{{}}<!-- -->'
      }
    })
    return template
  }

  _mappedValue(template) {
    const walker = document.createTreeWalker(template.content, 133, null, false)
    let index = 0
    while (walker.nextNode()) {
      const node = walker.currentNode;
      if (node.nodeType === 3 && node.textContent.startsWith('{{')) {
        node.textContent = ''
        this.parts.push({
          index: index
        })
      }
      index++
    }
  }

  _update(rootNode, values) {
    const walker = document.createTreeWalker(rootNode, 133, null, false)
    let index = 0
    while (walker.nextNode()) {
      const node = walker.currentNode
      const valueIndex = this.parts.findIndex(v => v.index === index)
      if (valueIndex >= 0) {
        node.textContent = values[valueIndex]
      }
      index++
    }
  }

}

const myRenderer = new MyRenderer
const myTemplate = (foo, bar) => myRenderer.html`
<div>
  <h1>Hello ${foo}</h1>
  <p>Write ${bar}, Every Day.</p>
</div>`
myRenderer.render(myTemplate('world', 'code'), document.getElementById('app'))

setTimeout(() => {
  myRenderer.render(myTemplate('zaru', 'blog'), document.getElementById('app'))
}, 1000)
テンプレートの宣言は Tagged Template Literal を使っています。
const myTemplate = (foo, bar) => myRenderer.html`
<div>
  <h1>Hello ${foo}</h1>
  <p>Write ${bar}, Every Day.</p>
</div>`
JavaScript に標準である Template Literal はバッククォートで囲むと変数が展開できたり、改行コードを含んで表現ができるので非常に便利なのですが、Tagged Template Literal はテンプレートを関数に渡して操作することができます。その場合、() のカッコで渡す必要がないのが特徴的な記法ですね(ぱっと見、JavaScript っぽくない)。
Tagged Template Literal の例です。
function html(strings, ...values) {
	// strings
	// ["<p>hoge ", " piyo</p>"]

	// values
	// ["fuga"]
}

const template = (foo, bar) => html`<p>hoge ${foo} piyo</p>`
template('fuga')
静的なテンプレート部分と動的な値部分を別で受け取れるので、これを利用して変更する箇所のマーキングをしていきます。また、Tagged Template Literal の第一引数はキャッシュされるので同じテンプレートであれば再利用されるというメリットもあります。
マーキングする箇所は、今回相当雑ですが lit-html を見習って適当に {{}} を入れてます(実際には lit-html はユニークなインデックス No を入れている)。また、変更箇所を手軽に TextNode 分割したかったので <!-- --> のコメントアウトも入れています。
_mark(strings) {
  let template = ''
  strings.forEach((string, index) => {
    template += string
    if (index < strings.length - 1) {
      template += '<!-- -->{{}}<!-- -->'
    }
  })
  return template
}
次に Template Literal で受け取った HTML 文字列を Node にする必要があるので <template> に変換します。ここでのテンプレートオブジェクトに変換するのは初回のみです。2回目からは生成済みの Node を捜査対象にして処理をスキップさせます(lit-html はテンプレートオブジェクト自体をキャッシュしているっぽい)。
const templateNode = document.createElement('template')
templateNode.innerHTML = template.markedTemplate
テンプレートにマーキングができたので、変更したい値とマッピングをさせます。
_mappedValue(template) {
  const walker = document.createTreeWalker(template.content, 133, null, false)
  let index = 0
  while (walker.nextNode()) {
    const node = walker.currentNode;
    if (node.nodeType === 3 && node.textContent.startsWith('{{')) {
      node.textContent = ''
      this.parts.push({
        index: index
      })
    }
    index++
  }
}
すべての Node を走査したいので document.createTreeWalker を利用します。これは Node を渡してフィルタ条件をしていすると、対象の Node を順番に見ることができる便利な API です。 nextNode() で次々と進み最後まで行くと null を返すので while でループしていきます。
変更対象は TextNode で(nodeType = 3)、{{}} な文字列なので条件分岐で該当 Node の Index を記録しておきます(すごいざるな条件分岐でごめんなさい)。ついでにマーキング用のテキストはもう必要ないので削除しておきます。
これでテンプレートと変更箇所が手に入ったので実際にレンダリングします。
_update(rootNode, values) {
  const walker = document.createTreeWalker(rootNode, 133, null, false)
  let index = 0
  while (walker.nextNode()) {
    const node = walker.currentNode
    const valueIndex = this.parts.findIndex(v => v.index === index)
    if (valueIndex >= 0) {
      node.textContent = values[valueIndex]
    }
    index++
  }
}
先程と同様に document.createTreeWalker で変更対象のインデックスまで進み、マッピングされた値を探します。そして該当の Node のテキストに値をセットすれば完了です。簡単ですね。
簡単ですね、と言ったんですがこれだけでもメチャクチャ面倒くさかったです。これに属性とかイテレータとか色んな要素を対応させようとすると地道な実装が必要になると思います…。ありがとう lit-html 。
というわけで今回は DOM の差分を効率的にレンダリングする方法を検証してみました。React や Vue などの Virtual DOM も面白いですが、lit-html のようなアプローチも面白いですね。
Photo by Tristan Gevaux on Unsplash